Tuesday, July 20, 2010

Veggie Stir Fry : remodel dinner #42


This is the second time veggie stir fry appears as a remodel dinner. Again, I used the sauce from this pork stir fry recipe. This time I used onions, carrots, radishes, green beans and bok choy. My sweetie cooked up some frozen pot stickers and steamed rice completed the meal. Yum!

And if all goes according plan (like THAT ever happens), tonight I will be cooking dinner on our new range!

Smoked Ribs : remodel dinner #41


For our Sunday dinner my sweetie decided to smoke some baby back ribs, and boy was I ever glad he did! They were delicious served up with some grilled corn and summer squash.

Sunday, July 18, 2010

Leftover Mexican food from lunch : remodel dinner #40

Not too exciting. We went out for lunch and had plenty of food leftover. So, "The Italian Job" in the blu ray player and leftover mexican food. We had a fun meal.

Friday, July 16, 2010

A whole week's list of dinners : remodel dinners # 33-39


I have no photos of the dinners we ate this week, save for one, the delicious pork roast my sweetie did on the grill Sunday night. So I am posting this picture of our new range. You'll see it's still in the garage. Hopefully it will be installed in the kitchen next week, and the 'remodel cooking' series on More Than Just Soup will come to an end. But one can never be certain of such things.


Here is a quick list of this week's dinners in case anyone is interested.

Sat. #33: BBQ chicken thighs

Sun. #34 : Pork roast

Mon. #35 : Albondigas Soup

Tues. #36: Arugula Risotto with Leftover Pork Roast

Wed. #37: Pizza (again!)

Thurs. #38 : Pepper Steak

Fri. #39: Date night! We are going to see Loverboy at the Boardwalk tonight, then out to dinner.

Friday, July 9, 2010

Corned Beef : remodel dinner #32


I was walking through the grocery store the other day and passed by some corned beef. Immediately my mind said "Hey, that's something that can be cooked in an electric skillet!" And so, it found it's way into my cart, and last night it found it's way into the electric skillet. Along with a can and a half of Guinness and some potatoes and carrots.

I made a variation of my usual corned beef recipe with oranges and onions, but no celery. I also didn't wrap it in foil, which is why I had to use so much more liquid. It still turned out passable, but it is not as good as my sweetie's home made corned beef!

Thursday, July 8, 2010

Chicken Stew : remodel dinner #31


With the chicken that didn't become fajitas I decided to put together a stew. We got potatoes and spinach from out CSA farm yesterday, so those went in to. I cut up and onion and some garlic and sauteed them until pretty soft with a small palmful of crushed red pepper flakes. Then I pushed them to the side of the pan and added the chicken which I had cut into biggish bite sized pieces. After the chicken had browned, I added about a cup of white wine and stirred it around and let it reduce a bit. Then I added some chicken broth (maybe a cup) and dijon mustard (maybe 2 tsp.), put the lid on and let it cook about 10 minutes. Next came some small red potatoes and another 10 minutes or so of cooking. Last I added the spinach and let it wilt. Voila! Dinner.

"Packet" Burritos : remodel dinner #30

No photos of this one, either. We call these "packet" burritos because they are seasoned with a packet. Specifically, this one from Lawry's. This was a another quicky made in the electric skillet. When the meat was done cooking, we pushed it to one side and heated up a can of refried beans right in the same skillet for easier clean up.

Steak Fajitas : remodel dinner #29


I went a little crazy at the grocery store. In addition to the whole chicken I bought for the rotisserie, I also bought a skirt steak and boneless chicken breast. My original thought was beef and chicken fajitas, but I realized that would be way too much food, so we saved the chicken for another night and just had steak fajitas. My sweetie made a simple marinade with achiote paste, orange juice and cayenne pepper (and probably a few other things, I wasn't watching closely).

Rotisserie Chicken : remodel dinner #28

The second meal cooked on the new grill: this amazing rotisserie chicken. I don't know for sure what was in the rub, but I know it had at least garlic and smoked paprika. That coupled with the smoke from the smoker box in the grill....perfection!

4th of July BBQ remodel dinner #27

We had our traditional family 4Th of July celebration on the 3rd this year. It was a great time with Family at my sweetie's dad's house. The cousins had some quality time swimming and the safe and sane fireworks show was not bad, either. Dinner consisted of way too much food including oysters, steak, corn on the cob, pasta salad, apple pie..... Sadly I have no photos to share, but I'm sure you get the idea.

Steak and Risotto : remodel dinner #26


First meal on the new grill : yummy yummy steak. (With a side of summer squash risotto.)

Friday, July 2, 2010

Pizza! (again) remodel dinner #25 (and a new grill)


The dining room floor is complete, but the kitchen and the living room not yet. The new grill arrived, but not getting hooked up until Friday morning. We enjoyed a delivered pizza while sweetie and G man assembled the new grill. I'm guessing my next post will involve something seared, or rotisseried, or somesuch!

Crow's Nest : remodel dinner #24

This was the day all of our furniture downstairs was removed to the garage in preparation for the flooring to be installed. G-man had already eaten a pretty early dinner, and my sweetie happened to be home early from work, so we took the opportunity to go out to dinner. We really enjoyed the food and the view at the Crow's Nest.

Lentils with potatoes and kale : remodel dinner #23


This one wasn't one of my favorites. For some reason it didn't turn out as good as I thought it should have, but it was still pretty tasty and plenty healthy. It's lentils, onions, garlic, chili powder, cumin, curry powder, coconut milk, tomatoes, chicken broth, potatoes and collard greens. (At least it had all those things in it by the end.) We ate this with some store-bought naan that was surprisingly good.

Cassoulet : remodel dinner #22

The cassoulet was tasty and a bit of a departure, sadly I have no photos because I couldn't find my camera in the construction mess. This was, of course, a super-simplified version of cassoulet. I browned some boneless skinless chicken thighs that I had cut in thirds. Then added a chopped onion, garlic, rosemary and oregano. Once those were softened, I added 2 cans of cannelini beans and a bit of chicken broth, covered it and let it simmer until the chicken was good and cooked. Then I added the sliced leftover sausage from Sunday and let it heat through and boil down a bit. I served it with a sprinkling of fresh chopped parsley and tasty french bread with butter.

Sausages with summer squash and chard : remodel dinner #21


Sunday's dinner : simple and delicious. Grilled sausages and summer squash with some sauteed chard and par-baked rolls from Beckmann's.

Cheeseburgers : remodel dinner #20


It's been a while since I've posted about our culinary adventures in remodel land. But we have still been eating. Rather than go into too many details at this point, I'll give some brief notes about what we've been eating.

Last Saturday : cheezburgers and salad.

Saturday, June 26, 2010

Pot Roast : remodel dinner #19


This one was a big hit. After having less than zero energy or motivation to cook the previous night, yesterday I decided to take a leap of faith and make a pot roast in the electric skillet. I had read myriad rave reviews about the process on line but remained skeptical. I also remained hungry for a good dinner, so I decided to give it a go.

This was a somewhat simplified version of my usual pot roast recipe. I bought about a 3 1/2 boneless chuck roast. Heated up the skillet to 350 and browned the roast on all sides after sprinkling liberally with salt and pepper all over.

I removed the roast back to the paper it came in (It's going to cook for at least 3 hours, any buggies it picks back up will be killed!) And sauteed one large diced onion for about 5 minutes. Then I added one can of beef broth and one can of diced tomatoes, with their juice, and a few shakes of Worcestershire Sauce.
Brought this up to a boil and returned to roast right in the center. I put on the lid and let it cook for about 2 hours and 15 minutes. Some quartered red potatoes and one-inch pieces of carrots went in, the lid went back on, and the whole thing cooked for about another hour. It turned out great! We really enjoyed it. I served it with fresh French Bread and roasted broccoli.

Friday, June 25, 2010

Takeout Burritos : remodel dinner #18

Yesterday was another one of those days where I couldn't quite muster up the energy or will to cook. To solve this problem, I called my sweetie on his way home and asked him to pick up some burritos. It was a great solution as the burritos were infinitely tastier then anything I would have come up with last night. Tonight, back to the electric skillet!

Braised Kielbasa with Veggies : remodel dinner #17


This is yet another one pot wonder I whipped up in the electric skillet. Again, not amazing, but it was relatively healthy and cleanup was easy peasy. My sweetie made some delicious garlic bread as an accompaniment.

I started by sauteing a large leek and some green garlic. Then I added the sliced Kielbasa and browned it. Once it was browned I added in some chicken broth (a cup or so?) and some diced potatoes and sliced carrots. After about 8 minutes I added one bunch of chopped collard greens, put the lid on it, and let it all simmer until the veg was appropriately soft.

Wednesday, June 23, 2010

Pasta with Meat Sauce : remodel dinner #16


For dinner last night I continued with the pasta theme, and made this pasta with meat sauce in the electric skillet (where else?) It was yummy and we both enjoyed having a familiar meal for a change. (I am posting this old photo because the photos I took last night are way too blurry)

Farfalle with Summer Squash : remodel dinner #15


The veggies are beginning to pile up. I'm finding it's really hard to use them all when I am not cooking lunch. And it's really hard to cook lunch with a houseful of construction workers. Oh well, the remodel is moving along swimmingly. Anyway, in an effort to use up some veg, I made this pasta with summer squash.

Just cooked up some pasta on the burner on the side of the grill.

I also sauteed some onions and garlic in the electric skillet, when they were soft I added in a big summer squash that I had quartered lengthwise then sliced. Then I added a few pinches of crushed red pepper. When the pasta was done, I drained it and added it straight to the skillet along with a few splashed of chicken broth (veggie broth would make this a vegan dish). I let the broth cook off and sprinkled on a few handfuls of grated parmesan cheese and some fresh basil.

My sweetie made some garlic "bread" (English Muffin)


Voila! Dinner.

Monday, June 21, 2010

Leg of Lamb, Fried Potatoes and Grilled Squash : remodel dinner #14


Father's Day was yesterday. My sweetie really likes lamb, but doesn't have it at home very often because I am not a big fan. For father's day he decided to make himself some leg of lamb. So I let him! ; ) He seared the lamb first in a cast iron skillet in the grill, then finished it off in the grill. Before cooking, he coated the lamb with 'The Paste', which is basically garlic, salt, thyme and olive oil. The potatoes were par cooked in the microwave, and finished up in a cast iron skillet. The squash was simply grilled, and very delicious! He had fun making and eating the meal, and I had fun hanging out with him while he did. (I did eat, too, of course, just not very much lamb.)

Saturday, June 19, 2010

Steak and Potatoes : remodel dinner #13

My big showcase was tonight, so sweetie-mine was on his own for dinner. He grilled a New York steak and made a potato pack (which apparently burned) and sadly has no photos because I had the camera with me in my purse. Oh well. Tomorrow the Father's Day Feast.....

Remodel Dinner # 12


Last night was the dress rehearsal for the student showcase of the studio where I take tap lessons. Because it was also a work day, no cooking occurred here last night. My sweetie and DS went out to dinner while I was at rehearsal, and I picked up a burrito on the way home. I will not be eating with the family again tonight, but my sweetie is planning to make dinner for himself. I will ask him to take some photos.

Friday, June 18, 2010

Braised Chicken Thighs with Mushrooms and Potatoes : remodel dinner #11


Yesterday the workers were only here until 6. Which is much better than 7:45. I wanted to make a special dinner for my sweetie (no particular reason) and took my inspiration from this Chicken with White Wine Sauce recipe.

There were three lonely pieces of bacon in the fridge, so I started with those. Fried up until they were pretty crispy, then took them out and browned the chicken thighs that I had sprinkled with kosher salt.


Once they were browned, I removed them along with most of the grease in the pan (soaked it up with paper towels because it was easy), then added a diced onion and a few tablespoons of chopped green garlic. After a little while, I added 8 ounces of sliced white mushrooms and a few teaspoons or so of dried basil and continued cooking until the mushrooms were brown.

Next I added about 1/2 cup of white wine and maybe a cup or so of chicken broth. I put the chicken thighs back in the pan, covered it with the lid and let it cook for maybe 15 minutes (I wasn't really keeping track of the time). I wanted to minimize the amount of dishes, so rather than make rice I just added some red creamer potatoes to the pan with the chicken and let it cook until they were done, maybe 15 minutes longer. A few Tbsp of wine with a little corn starch stirred in thickened it up just a touch. Then I chopped up the bacon and sprinkled it on top with some fresh flat leaf parsley.


I served this delicious concoction with a tasty green salad with ranch dressing. Yum yum yum! (Too bad the Celtics couldn't have been as successful as this dish!)

Thursday, June 17, 2010

Pizza! : remodel dinner #10


Yesterday was by far the hardest day yet of this remodel business. The electricians started at 7:45 am and the sheet rockers were here until 7:45 pm. G had volunteer work at our neighborhood elementary school from 10 until 2, then a doctor's appointment at 3:30. In between we went out to lunch and to the car wash, but we were still home around 4:45, for 3 hours of pounding and sawing. Not to mention dust, and not being able to access the deck. Sooooo....this is a long way of saying we ordered pizza for dinner. Many thanks to my sweetie for being so understanding!

The good news is that the sheetrockers worked so late because their schedule was pushed up 2 days because the cabinets are arriving early : today! The cabinet installation will begin tomorrow!

Wednesday, June 16, 2010

Veggie Chili : remodel dinner #9


Here's another simple one. Chili, in the electric skillet (of course!). I chopped up about 3 or 4 spring onions, a stalk of green garlic and one each red and green bell pepper. Sauteed in olive oil until starting to soften, then stirred in about 2 Tbsp chili powder, 2 tsp cumin and 1-2 tsp dried oregano. After that i added a can of diced tomatoes ( I got basil, garlic and oregano by mistake, but it worked out fine) and a big can of kidney beans. Normally I would drain and rinse the beans, but my lack of a sink caused me to be lazy and dump the whole shebang in the pan. Because of this, it took a little while for all of the liquid to boil away, but the chili was pretty good.


We had it with flour tortillas while watching the Celtics get badly beaten by the Lakers. Game 7 should be good!

Tuesday, June 15, 2010

Veggie Stir Fry : remodel dinner #8


The electric skillet we bought sure is getting a workout! Last night I used it to make a veggie stir fry. I used the sauce from the spicy pork stir fry to season the veggies : broccoli, carrots, onions and oyster mushrooms. I also used a bit of my favorite chili garlic sauce to spice it up a bit.


Monday, June 14, 2010

Grilled Sausage Sandwiches and Summer Squash : remodel dinner #7


Another super simple but tasty dinner. My camera ran out of room, so I don't have photos of the sandwiches, but I think you'll get the idea. My sweetie grilled some hot Italian sausages to perfection.
In the meantime, I sliced up one red bell pepper and one onion and cooked them in a bit of olive oil in the electric skillet.


My sweetie also grilled summer squash that we had halved.


Enter a couple of Francesi Rolls from Beckmann's Old World Bakery, and you've got yourself dinner!

Saturday, June 12, 2010

Smoked Tri-tip : remodel dinner # 6


My sweetie made this delicious tri-tip. I don't know exactly what he did, but it looked like a wet rub of garlic, salt, pepper, olive oil and thyme. Into the smoker it went, then was finished on the grill. Yummo!

Friday, June 11, 2010

Casa Rosita's : remodel dinner #5

Casa Rosita's. If you're not familiar with the name, get used to it. You are likely to see it on this blog at least a few more times before this remodel is over. Casa Rosita's is our neighborhood Mexican restaurant and our standby when we need a quick meal. During the school year G and I generally eat lunch there every Friday.

I had rehearsal tonight until 7, and rather than deal with cooking and trying to clean up in the dark, we got Mexican takeout instead. I forgot to take photos, but I am certain there will be another chance!

Thursday, June 10, 2010

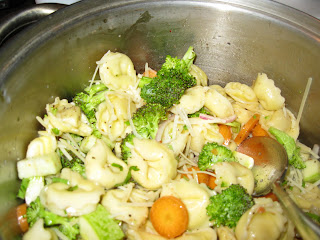
Tortellini Salad and Roasted Beets : remodel dinner #4


Tonight's dinner was pretty simple, while still using up a fair amount of CSA veggies. While looking through the fridge and freezer for inspiration, I spied a pack of tortellini from Costco in the freezer, and this is where that led.

I put a 'steamer ' pot to boil on the extra grill burner, then chopped up about 1/2 a summer squash, one carrot, a spring onion, and roughly 1 cup or so broccoli florets. When the tortellini were done cooking (I cooked about 2 1/2 cups) , I drained them then put them back in the pot with the vegetables and about 2 Tbsp of Italian dressing and a small handful of shredded Parmesan cheese. I also added about 1 1/2 Tbsp of fresh basil from the garden, then tossed it all together and set it aside.

For the beets: I cut 3 smallish beets into roughly 1 inch chunks. Then put them on foil and tossed with olive oil, salt and pepper. I added a few sprigs of fresh rosemary from the garden and roasted them in the toaster oven at 450 for about 30 minutes. So aromatic! My sweetie kept saying "It smells like rosemary". : )

Pan Seared Breaded Tenderloin : remodel dinner #3 aka DENIAL


Pan Seared Breaded Tenderloin : remodel dinner # 3 aka DENIAL

My sweetie worked from home yesterday and so decided to cook dinner. He decided to bread and pan fry the pork tenderloin we had in the fridge. After brining it.


Then coating it with mustard.


And making a breadcrumb coating. Then coating the tenderloin... And oh, yeah, we don't have a kitchen sink. Or a stove. Most of our cooking implements are in boxes in the garage. But no matter, he wanted his breaded tenderloin and nothing was going to stop him. Not even my merciless teasing about making such a complicated dish when we were kitchenless.

Have grill will cook.


Needless to say, dinner was late. And as we have no power to the back side of the house it was not only very cold, but dark out by the time we were done. I am, however, happy that he endured because the tenderloin was extremely delicious! I made some garlicky kale and plain rice as sides.

Bon Appetit!

Wednesday, June 9, 2010

Chili Verde : remodel dinner #2

Chili Verde : simplified and in the electric skillet

Since I had purchased tortillas for the quesadillas, I wanted to prepare something to use them up. Thus this simplified chili verde. It turned out surprisingly good, albeit a bit too salty. And it's about as simple as it gets

I cut one pork tenderloin into cubes (maybe 1/2 inch), sprinkled it with garlic and onion powders and salt, then browned it in the electric skillet. Once it was browned, I poured in a jar of salsa verde and a little bit (1/2 cup maybe) of chicken broth. Then I "simmered" it for what ended up being about 90 minutes, but it was probably ready to go after 45. I put the "simmered" in quotes because I discovered the electric skillet stays on for about 15 seconds, then goes off for about 45 seconds. So it's not the most even of heats, but I just turned it as low as it would go and all was yummy!

Tuesday, June 8, 2010

Fideos in the rice cooker : remodel dinner #1


Well, last night was the first night without the kitchen. I made fideos using the electric frying pan and the rice cooker. Rather than puree the tomatoes, etc, I simply added about 1/3 cup of salsa and some onion and garlic powders to the noodles and broth (this dish is vegan if you use veggie broth) in the rice cooker (after browning the noodles in the electric frying pan) and pressed the button. The noodles were a little dry initially, so I added some more broth and cooked them for just a little longer.


I also made mushroom and onion quesadillas in the electric frying pan. Cut up and sauteed some onions and mushrooms. Then made quesadillas with the veg and some pre-shredded cheese and flour tortillas.

Far from gourmet, but definitely servicable.

Thursday, June 3, 2010

T minus four days and counting....

In four short days our kitchen is scheduled to be completely ripped out. And then rebuilt (yes, we have the technology). While I don't have an exact completion date for this project, I am guessing it will take (at least) 3 months. Yes, I said three months! Three months without a range. No oven. No dishwasher. Heck, not even a kitchen sink.

To prepare for the event, I have been a crazy packing fool over the past 2 weeks. And I have many boxes to donate as well. It's really amazing how much stuff can accumulate in a small kitchen over the course of ten years or so.

Since this blog was started to share recipes with friends and family who might be interested in them, I am going to try and document my cooking experiences during the remodel. Last weekend we purchased a small countertop microwave and and electric frying pan. I will also have both the charcoal and gas grill (which has a regular burner), and a toaster oven. These appliances, except the grills, will likely be set up on a table in the garage. I'm sure the neighbors will love viewing my culinary prowess, er experimentation!

In the meantime, we will be baking cookies and making macaroni and cheese and maybe pizza one more time before the oven goes to it's new home.

Look for pictures and recipes in the coming months!

Thursday, April 29, 2010

Green Garlic Soup


It's spring! Well, I guess technically it's been spring for awhile, but now I know for certain that it's spring. Wanna know how I know? This soup, that's how! Many people know it's spring when the asparagus first appears in the market, or when the daffodils begin to bloom. For me, I know it's spring when I've made the first batch of green garlic soup.

This recipe came about completely by accident the first year I became a member of our CSA. We got this beautiful bunch of (what I thought were) leeks, and I found a great recipe in Cooking Light for Cream of Leek soup, and proceeded to make it. Only then did I discover that what I thought were leeks was actually green garlic. But no matter, we loved the soup, and I look forward to it every spring when we have the abundance of green garlic from the CSA

Green Garlic Soup

adapted from Cooking Light

3 Cups Green Garlic, Cleaned and Sliced
2 Cups Broth, Veggie or Chicken
1 tsp Fresh Thyme (or Rosemary)
1 Tbsp Flour
2 Cups Milk (I use 1%)
Dash of Ground Nutmeg
2 tsp. Butter
Salt
1/2 tsp. Grated Lemon Zest (optional, but gives a nice pop to the soup)

Put the sliced green garlic in a medium sauce pan with the broth and thyme (or rosemary). Bring to a boil over medium-high heat. Reduce heat to a simmer, cover and cook for about 10 minutes until the garlic is soft. Remove the garlic to a food processor with a slotted spoon. Process until smooth, adding cooking liquid as needed to get a nice smooth consistency. Set aside.

In another pot (or the one you just used, rinsed out), whisk together the flour and the milk. Add the pureed green garlic and the nutmeg (and any leftover cooking liquid from the garlic if the soup seems too thick). Bring it to a boil, reduce the heat, and simmer for 5 minutes, stirring constantly.

Remove from the heat and stir in the butter and lemon zest, if using.

For a printer-friendly version of this recipe, click here.

Tuesday, April 13, 2010

Creamy Cabbage Casserole


My sweetie was away for the weekend a few weeks back, and I had a big craving for macaroni and cheese, but, knowing I would likely eat a LOT of it, decided that maybe making a big pasta dish wasn't such a great idea. In order to satisfy my craving, I came up with this cabbage casserole. It's basically macaroni and cheese, but with cabbage instead of pasta. I really enjoyed this dish, and have made it a few times in the intervening weeks.

Creamy Cabbage Casserole

2 tsp Olive Oil
1/2 Onion, thinly sliced
1 Medium Head Cabbage, cored and thinly sliced
1 Tbsp Olive Oil
1 Tbsp Butter
2 Tbsp Flour
2 Cups Milk
Freshly Grated Nutmeg
Freshly Ground Black Pepper
1 - 1 1/2 Cups Shredded Cheese (Cheddar, Jack, Fontina, any good melting cheese you like, or a combination)
2 Tbsp Melted Butter
1/4 Cup Dry Breadcrumbs or Panko
1/4 Cup Shredded Parmesan Cheese


Lightly butter an 8-inch square baking dish

Preheat Oven to 350

Heat the 2 tsp olive oil in a saute pan over medium heat. Add the onions and cook until beginning to soften, about 5 minutes. Add the cabbage and cook until just wilted, stirring often, about 8-10 minutes more. Remove the cabbage from the heat and set aside.

In a medium sauce pot, heat the butter and olive oil over medium heat until the butter melts. Whisk in 2 tbsp of flour, and cook, stirring constantly, for 1-2 minutes to remove any raw flour taste. Slowly whisk in the milk, stirring constantly to avoid lumps. Bring to a simmer and cook, stirring often, until the sauce thickens, about 5 minutes. Stir in the cheese a handful at a time, making sure each handful is melted before adding more. Reduce the heat to low and gently cook the sauce for a few more minutes. Stir in nutmeg and black pepper to taste. Remove from heat.
Combine the cheese sauce and the cabbage onion mixture in whichever pan/pot will hold both easier, and transfer the mixture to your prepared baking dish. Combine the melted butter, breadcrumbs, and Parmesan cheese. Sprinkle over the cabbage in the baking dish.

Bake in the 350 oven until the top is nice and brown, 15-20 minutes.

For a printer-friendly version of this recipe, click here.