Friday, February 26, 2010

Roasted Leeks with Parmesan Cheese


Yesterday was my sweetie's birthday, and I made one of his favorite dishes, this Chicken with White Wine and Mushroom Sauce. I also wanted to make a tasty appetizer for us to eat while the chicken was braising, and the leeks in my CSA share inspired me to try something new. Roasting the leeks really made them sweet and delicious, and I thought the Parmesan cheese added a nice nutty note to them.

I served this as an appetizer, but it would also make a great side dish for any roasted or grilled meats.

Roasted Leeks with Parmesan Cheese


3 Large Leeks, White and Light Green Parts Only
1 Tbsp Olive Oil
Salt
1 Tbsp Shredded Parmesan Cheese

Preheat oven to 350

Cut the leeks into 2-3 inch pieces, then halve them lengthwise. Put them cut-side down in a bowl of cold water to clean out all the dirt from between the layers. Go ahead and let them soak awhile, 10 minutes or more. Move them around in the water as necessary to get the dirt out. You can also slightly separate the layers and run them under cold water if you need to.

Pat the leeks dry and rub them with olive oil. (You may not need the whole tablespoon) Place them on a baking sheet cut-side up and sprinkle with salt. Roast until very soft and nice and brown, 30-45 minutes. Turn over (carefully) about half way through cooking time.

Remove to a serving bowl or platter and sprinkle with the parmesan cheese.

For a printer-friendly version of this recipe, click here.

Thursday, February 25, 2010

Chipotle Black Bean Chili


Here is a simple, but oh-so-satisfying vegetarian chili. It's great on a cold winter night, but equally good at a summertime barbecue.

I have included instructions for preparing the dry beans from scratch, but if you don't have time, go ahead and substitute three 15-ounce cans of black beans. The chili will still be fabulous!

Chipotle Black Bean Chili

3/4 Pound Dry Black Beans
1/2 Large Onion Cut in Half
1 Carrot, Quartered
1 Celery Stalk, Quartered
1 Bay Leaf
1/2 tsp Crushed Red Pepper Flakes
6 Cups (approximately) Water

2 tsp Canola Oil
1 Large Onion, Diced
1 Bell Pepper, Diced - Any Color, I used red this time.
1 Cloves Garlic, Minced or Pressed
2 tsp Canned Chipotles in Adobo Sauce
1 tsp Ground Cumin
1 tsp Mexican Oregano
1 28 Ounce Can Diced Tomatoes, Plain or Fire-Roasted
1 Cup Veggie Broth

Optional Garnishes:

Fresh Chopped Cilantro
Sliced Green Onions
Shredded Cheese
Sour Cream

Soak the beans overnight (or all day before cooking). Put the beans, onion, carrot, celery, and bay leaf in a large pot. Cover with water by about 1 inch and add the pepper flakes. Bring to a boil, reduce to a simmer and cook until the beans are soft. Depending on the age of the beans, this can take anywhere from about 25 minutes to an hour. When the beans are done cooking, drain them, discard the veggies and set them aside.

Heat the oil in a large pot or dutch oven over medium heat. Add the onions and bell pepper and cook until beginning to soften, about 5 minutes. Add the garlic, chipotle, cumin and oregano and cook, stirring often, for about 2 minutes. Add the beans, tomatoes with their juice, and broth. Bring to a boil, reduce heat and simmer until the flavors have melded and the tomatoes cook down a little, at least 15 minutes, up to an hour, stirring often.

Garnish as desired and serve with skillet corn bread.


For a printer-friendly version of this recipe, click here.

Wednesday, February 24, 2010

Chicken Noodle Soup with Tahini and Green Onions


This is a very interesting soup recipe I got off of the Epicurious website way back in 2002. They call in "Chinese Chicken Noodle Soup with Sesame and Green Onions". I have modified the recipe a bit, and changed the title. While the soup is definitely Asian inspired, I have never seen tahini used in Chinese cuisine. But maybe I'm missing something?

Anyhow, I usually make this soup with chicken breast, but my store was out so I got thighs instead and the soup did not suffer one bit!

This recipe makes a HUGE pot of soup, and it's a good thing, too, because it's so good you will really want the leftovers for lunch!

Chicken Noodle Soup with Tahini and Green Onions


1 Pound Boneless Skinless Chicken Breast, Thigh, or a Combination Cut into Bite-Sized Pieces
3 Tbsp Soy Sauce
2 Tbsp Dry Sherry
1 Tbsp Sesame Oil
3 Cloves Garlic, Minced or Pressed
3 Tbsp Tahini
2 Tbsp Minced Fresh Ginger (1 Tbsp if from a jar)
1 Tbsp Sugar
1 Tbsp Rice Vinegar
2 tsp Chili-Garlic Paste (more or less to taste)
1 Tbsp Canola Oil
1-2 tsp Sesame Oil
4 Cups Chopped Napa or Green Cabbage
6 Green Onions, Thinly Sliced
8 Cups Chicken Broth
1 Package Fresh Asian Noodles (Mine was 9 ounces)
1/2 Cup Chopped Fresh Cilantro

Stir Chicken, soy sauce, Sherry, and 1 Tbsp sesame oil in a medium bowl. Set aside while you prepare the rest of the ingredients.

Whisk the garlic, tahini, ginger, sugar, vinegar and chili sauce in a small bowl.

Heat 1 Tbsp canola oil and 1-2 tsp sesame oil over medium heat. add cabbage and green onions and saute until cabbage is tender, 5-10 minutes. Add broth and bring to a boil. Add chicken with marinade and tahini-garlic mixture. Reduce heat to low and simmer until chicken is cooked, about 5-8 minutes.

Cook noodles according to package directions. Drain and add to the soup in the pot. Stir in half of the cilantro. Season soup with salt and pepper and sprinkle with remaining cilantro.

For a printer-friendly version of this recipe, click here.

Monday, February 22, 2010

Roasted Garlic and Chive Ricotta Cheese Spread


I had a container of ricotta cheese in the fridge that needed to be used up. I didn't have much success with a Google search, recipes for "Ricotta Pie" which didn't seem like it would fit the bill this time.

And so, I present to you.....

Roasted Garlic and Chive Ricotta Cheese Spread

1 Whole Head Garlic
1 15-Ounce Container Ricotta Cheese (Fat Content of Your Choice)
2 Tbsp Minced Fresh Chives
2 tsp Minced Fresh Parsley
Salt and Pepper

Preheat Oven or Toaster Oven to 350

Peel the papery skin from the head of garlic, but keep the head in tact. Wrap tightly in aluminum foil and bake until very soft, about 1 hour. Remove from the foil and set aside.

Place the ricotta cheese in a colander lined with cheesecloth over a bowl. Drain for about 30 minutes. (I skipped this step, and my spread is getting watery.)

When the garlic is cool, squeeze the cloves into a medium bowl. If you are not a super garlic lover, start with 5 or 6 cloves, and add more at the end if you decide you want more. I used the whole head this time, which was 12 cloves. Leftover roasted garlic can be added to many soups or sauces if you do have leftovers. Add in the ricotta cheese and herbs, and stir well to combine. Season to taste with salt and pepper. You can serve this spread with crackers, sliced bread, veggies, or as a sandwich spread.

Friday, February 19, 2010

Chipotle Chicken Chowder


This is one of our favorite soups, but for some unknown reason we have not had it in ages. It went really great with the Olympics last night. We actually ate in front of the TV which is quite a rarity for us.

This soup is very flavorful and filling without being too rich. Add a salad or maybe a quesadilla, and you've got dinner!

1-2 Canned Chipotle in Adobo Sauce, Minced
1 tsp Adobo Sauce from Can
2 tsp Canola Oil
1 Large Onion, Chopped
2 Carrots, Chopped
1 Celery Stalk, Chopped
1 tsp Ground Cumin
1 tsp Dried Mexican Oregano
1/2 tsp Dried Thyme
4-6 Garlic Cloves, Minced or Pressed
6 Cups Chicken Broth
1 1/2 Pounds Boneless Chicken Breast, Thighs, or a Combination
2 Medium Red Potatoes, Diced
1 15.5 Ounce Hominy, Yellow or White, rinsed and drained
1/4-1/2 Cup Whipping Cream, depending on how thick you like your soup
1 15 Ounce Can Diced Tomatoes, Drained (in the summer go ahead and use fresh!)
1/4 Cup Chopped Fresh Cilantro
1/2 tsp Salt, or More To Taste

Heat oil in a large Dutch oven or soup pot over medium heat. Add chipotles, onions, carrots, celery, cumin, oregano, thyme and garlic. Cook about 8 minutes until the onion is tender, stirring frequently. Stir in broth and bring to a boil. Add in the chicken, reduce heat, cover and cook until chicken is tender, about 30 minutes. Remove the chicken with a slotted spoon. Shred with 2 forks, or cut into bite-sized pieces. Cover and keep warm.

Using a slotted spoon, remove the solids from the broth and put in a food processor fitted with a steal blade. Process until smooth and return to the broth in the pot. Stir in the potatoes and hominy. Bring to a simmer over medium heat. Cook, uncovered, until the potatoes are tender, about 20 minutes. Add the tomatoes, chicken, and cream and cook about 5 minutes more, until heated through. Remove from the heat and stir in the adobo sauce, cilantro, and salt.

For a printer-friendly version of this recipe, click here.

Thursday, February 18, 2010


Here is another pork tenderloin recipe. I really do love pork tenderloin because you can cook it so many different ways. This one is a little spicy with the chili-garlic sauce. Feel free to add more or less depending on your personal preference.


1/4 Cup Soy Sauce
3 Tbsp Sugar
1 Large Clove Garlic, or 2 Small, Minced or Pressed
1 Tbsp Fresh Ginger (or less if from a jar)
1 - 2 tsp Chili Garlic Sauce, Depending on your heat preference
1 Tbsp Sesame Oil
1 Pork Tenderloin, 12-16 ounces
Green Onions for Garnish

In a shallow bowl large enough to hold the pork in a single layer (a square pyrex is perfect for this job), whisk the soy sauce and sugar until the sugar is dissolved. Stir in the garlic, ginger, chili-garlic sauce and sesame oil.

Cut the tenderloin crosswise into 1-inch pieces and add them to the marinade. Cover and marinate in the refrigerator for about 2 hours. Don't go too much longer, or the pork will get too salty.

Preheat your grill to medium heat. (I cook these inside on my grill pan; it works great.) Remove the pork from the marinade. Grill the pieces until just cooked, about 5 minutes per side. If you want groovy grill marks on the meat, turn it 1/4 turn halfway through (at the 2 1/2 minute mark) to get the cross-hatch marks that make people say "Oooh...grilled food!".

Put the pork on a platter and sprinkle with green onions.

For a printer-friendly version of this recipe, click here.

Wednesday, February 17, 2010

Chipotle Mashed Yams


I wanted something other than rice to go with the Chili-Rubbed Tenderloin I made the other night, went rummaging in the pantry, and found a few yams. Yay! Chipotle yams it would be. These would also be great with grilled or roasted chicken, or with a nice black bean and corn salad for a vegetarian meal.

Chipotle Mashed Yams

2 Medium Yams
1 Tbsp Butter
2 Tbsp Milk (or more if needed to get desired consistency)
1 tsp Chopped Chipotle Chili in adobo (Or more to taste)
1/2 tsp Adobo Sauce from the Chipotle Can (or more to taste)
Salt and Pepper

Peel and chop the yams into roughly equal size pieces. Place in a sauce pan and cover with water. Bring to a boil, reduce heat and simmer until very soft, about 15 minutes. Drain the yams and return them to the pot. Begin mashing with a potato masher. When they are about 1/2 mashed, add in the butter and milk. Continue mashing, adding more milk as needed, until the desired consistency is reached. Stir in the chili, adobo sauce, salt and pepper. Taste and adjust seasonings as needed. I typically add up to 2 tsp of chipotle, depending on how spicy the rest of the meal will be.

For a printer-friendly version of this recipe, click here.

Tuesday, February 16, 2010

Chili Rubbed Pork Tenderloin


Here is another super simple but incredibly tasty pork tenderloin recipe.

1 1/2 Tbsp Chili Powder
1 Tbsp Brown Sugar
2 tsp Ground Cumin
1 tsp Garlic Powder
1/2 tsp Salt
1/4 tsp Pepper
1 12-16 ounce Pork Tenderloin, trimmed

Preheat Oven to 375

Combine chili powder, brown sugar, cumin, garlic powder, salt and pepper in a small bowl. Put the tenderloin on a rack inside a baking pan and rub all over with the spice mixture. Bake in the 375 oven to a temperature of about 140 degrees. Remove from the oven, tent with foil, and let rest for at least 10 minutes before slicing.

For a printer-friendly version of this recipe, click here.

Friday, February 12, 2010

Brownies


So this is one way to get my heart-shaped food. You can cut these brownies into any shape you like, not just traditional squares. I like my brownies chewy, and this recipe reflects that. If you prefer cake-like brownies, this one may not be for you.

I'm sure I don't need to tell you the myriad ways you can eat brownies. There is just plain, of course, or with ice cream, or whipped cream, or.....Well you get the idea. I hope you enjoy these with your sweetie. Or all by yourself if you don't feel like sharing. I won't tell anyone! ; )

3/4 Cup Melted Butter
1 1/2 Cups Sugar
1 1/2 tsp Vanilla
3 Eggs
3/4 Cup All Purpose Flour
1/2 Cup Unsweetened Cocoa Powder
1/2 tsp Baking Powder
1/2 tsp Salt
1 Cup Semi-Sweet Chocolate Chips

Preheat Oven to 350

Grease a 13 x 9 inch baking pan

Combine the butter, sugar, eggs, and vanilla in a mixer. Combine the flour, cocoa powder, baking powder and salt in a separate bowl. Add the flour mixture to the mixer and mix until combined. Stir in the chocolate chips.

Pour into the pan and bake for 20-22 minutes. Cool in the pan on a wire rack before cutting and serving.

For a printer friendly version of this recipe, click here.

Thursday, February 11, 2010

Butternut Squash Lasagna


Oh, I really wanted to make something heart-shaped for Valentine's Day. I'm not exactly sure why that is, but I did. I tossed dozens of ideas around, but none of them seemed appropriate somehow. So finally I gave up on heart-shaped, and just went for yummy.

Make this lasagna for your sweetie, and they will be yours forever!


Butternut Squash Lasagna


Inspired by a recipe from Giada de Laurentiis

1 Medium Butternut Squash (about 2 lbs)
Olive Oil for Rubbing the Squash
Salt and Pepper
1/2 Cup Water
3 Tbsp Butter
3 tbsp Flour
3 Cups Milk (2% or Whole)
1/2 Loosely Packed Fresh Basil Leaves
Salt and Pepper
1 1/2 - 2 Cups Shredded Mozzarella Cheese- depending on how cheesy you like it!
1/4 Cup Shredded Parmesan Cheese
6 No-Bake Lasagna Noodles
Olive Oil or Butter for Greasing Baking Pan

Preheat the oven to 350. Cut the squash in half and scoop out the seeds. Rub the cut sides of the squash with olive oil and sprinkle with salt and pepper. Place cut-side down in a baking dish, add 1/2 cup water, cover and bake until very tender, about 45-60 minutes. Alternatively, you can cook the squash covered in the microwave until tender, about 15 minutes. When cool enough to handle, scoop out the flesh, mash it up with a fork, and set aside.

Melt the butter in a medium sauce pan over medium heat. Whisk in the flour and continue whisking for about one minute. Gradually add the milk, whisking the whole time to prevent lumps. Continue cooking over medium to medium-high heat, whisking constantly, until the sauce comes to a boil. Reduce the heat to low, and continue cooking until thickened a bit, about 5 minutes. Whisk often to prevent lumps. Remove from heat.

Put the basil leaves in a food processor and pulse 3 or 4 times to chop them up. Add about 1/2 of the sauce to the processor and process until the basil is well-incorporated. Return the basil-sauce to the rest of the sauce in the pan, and stir to combine.

Preheat the oven to 375

Lightly grease an 8 x 8 inch baking dish. Pour about 1/2 cup sauce in the bottom. Cover the sauce with 2 of the lasagna noodles. Spread 1/2 of the squash over the noodles. Sprinkle about 1/2 cup of mozzarella cheese over the squash. Repeat the layers : sauce, noodles, squash, mozzarella. Drizzle some sauce over this layer of mozzarella, cover with 2 more noodles, and pour the remaining sauce over top. Cover tightly with foil and bake until nice and bubbly and the noodles are soft, about 35-40 minutes. Remove from the oven. Take off the foil and sprinkle with the remaining mozzarella and the parmesan cheese. Return to the oven until the top is nicely browned, 10-15 minutes longer. Let sit for about 15 minutes before serving.

For a printer-friendly version of this recipe, click here.

Wednesday, February 10, 2010

Balsamic Beet Salad


Continuing with the Valentine's Day theme, here is a very red side dish that can be served with any number of things, including roasted chicken.

1 Bunch Beets (about 1 1/4 - 1 1/2 pounds)
2 Tbsp Balsamic Vinegar
2 tsp Olive Oil
1 tsp Dried Oregano
Salt and Pepper to Taste

Scrub the beets well. No need to peel yet, we will get to that later. If your beets are small, you can cook them whole. If they are larger, you will want to cut them into smaller pieces for quicker cooking. Mine were about medium and I quartered them lengthwise.

Put the beets in a medium pot and cover with water. Bring to a boil, reduce to a simmer, and cook until the beets are tender. This will take about 30-45 minutes depending on the size of the beets. When the beets are tender (stab one with a fork or the tip of a knife to test for doneness), remove them from the heat and drain. Put some cold water in the pot with the beets to cool them down a bit and pull the skins off. They should slip right off. I like to do this with the pot in the sink.

Drain the beets and put them in a salad bowl. Cut them into slices or bite-sized chunks and pour the balsamic vinegar over them. Stir to coat with the vinegar, then add the remaining ingredients and stir again. Adjust seasonings as needed. Serve warm or at room temperature.

For a printer-friendly version of this recipe, click here.

Tuesday, February 9, 2010

Roasted Chicken


Valentine's Day is this Sunday. If you haven't already arranged for a babysitter and made a reservation at your favorite romantic restaurant, chances are you'll be eating in this year. Between now and Friday look for recipes that can be mixed and matched for a simple yet elegant meal for you and your sweetie, whether they be a meat-eater or a meat-freer. First up, roasted chicken. This is so simple to prepare, yet always makes an elegant presentation.

Roasted Chicken

1 Whole Chicken
2 tsp Olive Oil
3-4 Cloves Garlic, Minced or Pressed
1 tsp Salt
1/2 tsp Pepper
2 tsp Fresh Herbs, such as Thyme or Rosemary
1/4 - 1/2 tsp Red Pepper Flakes, depending on how spicy you like things
1/2 tsp Paprika
1 Lemon, Halved
1-2 Sprigs Fresh Rosemary
1-2 Sprigs Fresh Thyme
1 or 2 Carrots
1 or 2 Stalks of Celery

Preheat Oven to 400

Remove and discard (or save for a later use) the giblets from inside the bird. Combine the olive oil, garlic, salt, pepper, herbs, pepper flakes and paprika in a small bowl. Place the carrot and celery in a roasting pan in such a way that the chicken can sit on top of them without touching the bottom of the pan. (Essentially, you want to use the veggies as a 'roasting rack' for the chicken. You can also use potatoes, onions, rutabagas, whatever you have on hand. This is a good use for veggies that are a bit past their prime.)

Place the chicken on top of the veggies in the roasting pan and rub it all over with the olive oil mixture. Put the cut-up lemon and remaining sprigs of herbs inside the cavity of the chicken. Roast in the 400 degree oven until done, about 1 1/2 hours. You can tell the chicken is done when a thermometer inserted in the thickest part of the thigh reads 170-175. Alternatively, you can give it the 'wiggle test'. Grab a hold of one of the legs (using a pot holder or paper towel) and wiggle it, if it feels like it would easily separate from the rest of the bird, it's done.

Let the chicken rest for at least 15 minutes before carving.


For a printer-friendly version of this recipe, click here.

Monday, February 8, 2010

Birchemuesli


Here is a simple, yummy, quick and healthy breakfast idea for you. This is a basic recipe, but you can use any flavor of yogurt and whatever fruit you have on hand to change this up in many ways. And don't limit yourself just to breakfast, this dish has made an appearance or two on our dinner table on a busy night....

1 Medium Apple
1/2 Cup Old Fashioned Oats
1/2 Cup Yogurt

Optional Ingredients:

Sliced, Diced or Chopped Fresh Fruit
Raisins or Other Dried Fruit
Walnuts or Other Nuts

Grate the apple over a bowl on the big holes of a box or cheese grater. Stir in the oats and yogurt. You can eat it just like this, or refrigerate until the oats get a bit soft. Stir in additional ingredients as desired. I really like bananas, strawberries, and walnuts, but any fruit or nuts that you like would make great additions.

For a printer-friendly version of this recipe, click here.

Saturday, February 6, 2010

Roasted Red Pepper Dip


Here is a quick one that you can throw together in almost zero time, but is both tasty and healthy! And who couldn't use at least one more healthy choice in their Superbowl spread. It's so simple, in fact, I don't think it needs a printer-friendly version! Go ahead and double the recipe if you have a crowd to feed.


Roasted Red Pepper Dip

1 12-ounce Jar Roasted Red Peppers (The jar I bought had garlic cloves in it, too. The roasted garlic gave the dip a really nice sweetness)
Handful fresh Parsley leaves
1 Clove Garlic , if your peppers didn't come with any
Salt and Pepper to taste

If using fresh garlic, peel it and process in your food processor until finely minced. Drain the bell peppers (and garlic, if yours came with it) and add it to the food processor along with the parsley. Process until smooth. Stir in salt and pepper to taste. Transfer to a serving bowl and enjoy with cut up vegetables, sliced french bread, or crackers.

Friday, February 5, 2010

Olive Oil Crackers


I have been wanting to make crackers for some time, but never got around to it. Until today. I needed to stay home due to some repairs taking place at home, and I needed something to go with the dip I was planning to make. And, of course, crackers go with whatever dips are being served on Superbowl Sunday, and I am sure lots of dips will be served that day!

I went looking around the 'net and came across this yummy sounding recipe. This was really fun to make and turned out great. I baked some whole sheets and broke them up, I cut some squares, and I cut 2 sizes of circles with biscuit cutters. I think my favorites are the whole sheets. I only seasoned with salt this time, but as with so many things, the sky really is the limit. Grated cheese, seeds, spices. You could sprinkle on whatever floats your boat just before popping these in the oven.


Adapted from a recipe by Heidi Swanson at 101 Cookbooks

Olive Oil Crackers

1 1/2 cups semolina flour
1 1/2 cups all purpose flour
1 teaspoon salt
1 cup warm water
1/3 cup extra virgin olive oil
Salt for sprinkling

Whisk together the flours and salt. Add the water and olive oil. Using a mixer with a dough hook attachment mix the dough at medium speed for about 5 - 7 minutes. Alternately, feel free to mix and then knead by hand on a floured counter-top. The dough should be just a bit tacky - not too dry, not too sticky to work with. If you need to add a bit more water (or flour) do so.

When you are done mixing, shape the dough into a large ball. Now cut into twelve equal-sized pieces. Gently rub each piece with a bit of olive oil, shape into a small ball and place on a plate. Cover with a clean dishtowel or plastic wrap and let rest at room temperature for 30 - 60 minutes.

While the dough is resting, preheat your oven to 450F degrees.


When the dough is done resting, flatten one dough ball. Roll into a thin sheet with a rolling pin. You can bake the entire sheet and break into crackers later, or you can cut into shapes now. Either way, place the cracker(s) on a corn-meal coated baking sheet and sprinkle with salt. Bake until nice and brown, 8-10 minutes or so. Remove the crackers from the baking sheet and proceed with the remaining dough balls. You will want to let the crackers cool before eating them to get the maximum crunch.

Thursday, February 4, 2010

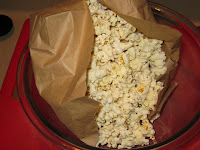
'Homemade' Microwave Popcorn


Popcorn is great snack food. It's healthy, inexpensive, and can be flavored in myriad of ways. This is a great way to make popcorn. It's certainly cheaper and healthier than the store-bought microwave popcorns, and once it's popped, you can doctor it up any way you like. The traditionalists out there will opt for melted butter and salt. Grated Parmesan cheese makes a nice addition, or chili powder, or whatever else floats your boat. I prefer mine with a spritz of cooking oil spray and a sprinkle of salt.

I have based this on an Alton Brown episode I saw once upon a time. Do not be alarmed by the staples in the bag. It really isn't a problem. I promise. I have been making popcorn this way for years. So pop up a bagful or three for your Superbowl party!


'Homemade' Microwave Popcorn

1/4 Cup Popcorn Kernels
1 Brown Paper Lunch Bag
2 Staples

Okay, so the bag and the staples are not really ingredients, but here's what you do. (And yes, I have had that stapler since the '70's.)

Put the popcorn in the bag.

Fold the bag over twice and secure with two staples.


Put in the microwave and cook however you normally cook microwave popcorn. My microwave has a 'popcorn' button which is what I use. I timed it today, and it took 1 minute 58 seconds to pop a batch. If you your microwave doesn't have a popcorn button, I would imagine setting it on high for about 3 minutes would do the trick. DO NOT walk away. There is nothing worse than the smell of burnt popcorn in your house or office. Once the popping has slowed to one pop every 2 seconds or so, it's time to turn off the microwave.


Tear open the bag carefully, and pour the popcorn into a large bowl. Season as desired and enjoy.

Wednesday, February 3, 2010

Garlicky Basil Cheese Spread


Since the Superbowl is this Sunday, and people often gather and eat snacky foods when the Superbowl is on, I thought for the rest of this week I would post a few of my favorite party snacks. First up, Garlicky Basil Cheese Spread. This is really easy to throw together, looks pretty, and everyone loves it. Plus, it is much cheaper than the pre-made ones they sell in the grocery stores. This recipe is based on one I saw on the Kitchen Parade website several years ago.

Garlicky Basil Cheese Spread

2-3 Garlic Cloves (More if you REALLY like garlic)
1/4 Cup Loosely Packed Fresh Basil Leaves
1/2 Cup Walnuts or Pine Nuts
1/2 Grated Parmesan Cheese
8 Ounces Neuchatel Cheese

Pulse the garlic in a food processor until finely chopped. Add the basil and pulse 2 or 3 times, then add the nuts and process until finely chopped. Don't process too long, or you will get garlic and basil flavored nut butter! Add the cheeses and process until smooth. Serve with crackers, cut up veggies, and/or french bread.

For a printer-friendly version of this recipe, click here.

Tuesday, February 2, 2010

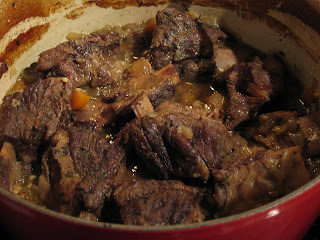
Braised Short Ribs


I guess it must be winter, since I am preparing so many 'winter foods'. This is a great recipe that you can put together and then leave in the oven for a bit while you do other things. Read a book, play board games, enjoy a nice fire... You get the idea. It's also nice, since the oven is already on, to cook the side dish in the oven at the same time.

Braised Short Ribs

3 - 3 1/2Pounds Beef Short Ribs
1 tsp Salt
1 tsp Pepper
1 tsp Dried Thyme
2 Tbsp Canola Oil
2 Cups Onions, Diced
1/2 Cup Celery, Diced
1/2 Cup Carrots, Sliced
1/4 Cup Shallots, Diced
3 or 4 Cloves Garlic, Minced or Pressed
Salt and Pepper
Pinch of Dried Thyme
1 1/2 Cups Beef Broth
2 Bay Leaves

Preheat the oven to 350

Trim the excess fat from the short ribs. Season them with salt, pepper, and dried thyme. Heat the canola oil in a dutch oven over medium heat. Add the short ribs, in batches, and brown on all sides, about 8 minutes per batch. Remove the short ribs from the dutch oven and pour off all but about 2 Tbsp of the fat. Add the vegetables, pinch each salt, pepper, and dried thyme, and cook, stirring occasionally, until starting to brown, about 10 minutes.

Add the beef broth and bring to a boil. Return the short ribs and add the bay leaves. Bake, covered, until the ribs are tender and the meat is pulling away from the bone, 1 1/2 - 2 hours. Remove the ribs and tent with foil. Remove the vegetables to a bowl with a slotted spoon. Pour the broth into a gravy separator. Pour back into the pot, leaving the fat behind. Reduce the sauce over medium-high heat until syrupy, then add back the vegetables and short ribs. Serve over mashed potatoes, rice, or butternut polenta.

For a printer-friendly version of this recipe, click here.

Monday, February 1, 2010

Butternut Squash Polenta


This polenta is really tasty. Polenta is really tasty on it's own without squash. And cooking it in the oven makes it a super simple dish to prepare. The addition of the squash just gives it an extra body and smoothness that makes it really special.


Butternut Squash Polenta

2 Cups Stock or Broth (Veggie or Chicken)
1 1/4 Cups Water
1 Cup Polenta
1 Tbsp Butter
1/4-1/2 Cup Parmesan Cheese
1 Medium Butternut Squash
Olive Oil for Rubbing the Squash
1/2 Cup or so Water
Salt and Pepper

Preheat the oven to 350

Cut in half and seed the squash. Rub the cut sides with olive oil and sprinkle with salt and pepper. Put cut-side down in a baking dish and add about 1/2 cup of water. Cover with a lid or foil, and bake until very soft, 40-60 minutes. When the squash is done cooking, remove it to a plate to cool, then scoop out the flesh, mash with a fork, and set aside. Alternatively, if you don't have room in the oven while the polenta is baking, you can cook the squash in the microwave: put in the halved, seeded squash and 1/2 cup water in a microwave safe dish with a lid or cover with plastic wrap. Cook on high for 10-15 minutes until very soft.

Butter an 8-inch square baking dish. Pour in the stock or broth and water. Stir in the polenta and 1 Tbsp of butter. Bake the polenta for 50 minutes. Remove from the oven and stir in the cheese. The polenta may be cooked at this point, if it is not, return it to the over for another 10 minutes.

When the polenta is done cooking, stir in the squash. Adjust seasoning as needed and serve.